
Contact
Kathmandu,Nepal
9745652548 / 49
Table of Contents
If you are thinking of starting a new business and don’t know where to find your market, then we are here to guide you through the process. Finding your customers on the Internet is the new trend. How to create an eCommerce website in Nepal?
You may get scared when you hear about new technologies. But don’t worry, you are not alone. To help new entrepreneurs start their business, we have created a full guide to set up your online store step by step with WordPress.
Things to Consider Before Setting Up an Online Business
You are never late to learn new things. With your personal computer and some dedicated time, you can get started within a matter of time. You don’t need high-tech knowledge to start an eCommerce website. You just need to consider the following things:
- Domain Name
It is the name of your business. For example: yoho.cloud
- Web Hosting Account:
It is the place where your websites will reside on the internet.
- Dedicated Time and Undivided Attention:
You must set dedicated time and undivided attention for your online business.
Sounds simple, isn’t it?
You can follow this complete guide and build your eCommerce website in less than 30 minutes. Here, we have listed the steps that we will cover in this article.
- Register a Domain Name for Free
- Choose the Best Ecommerce Hosting like Yoho.Cloud
- Get an SSL Certificate for Free
- Install WordPress
- Create a WooCommerce store
- Add Products to your Online Store
Step 1: Choose your Online Store Platform
Before starting an eCommerce website, it is better to choose the right platform for your online store. So that you can reach your right customer in the right market. There are two popular eCommerce platforms that you can choose between Shopify or WordPress + WooCommerce.
Shopify is the hassle-free, fully hosted eCommerce platform where you can just log in and start selling your product. The subscription starts at $29 per month. You can pay monthly or yearly upfront to earn a discount. But, Shopify is quite expensive and there are limited payment options.
On the contrary, WordPress + WooCommerce is quite popular among users because of the flexibility it offers. WordPress is the most popular website builder that requires some setup and WooCommerce is the world’s largest eCommerce platform that is worth trying in the long run.
In this article, we will guide you to set up an online business on WordPress using WooCommerce (step by step).
To start your online business, you need the following things:
- Domain Name
A domain name is the name of your website/business on the internet. It is the name that the users will see or use to reach your website. For example google.com, yoho.cloud, etc.
- Web Hosting
Web hosting provides a place for your website on the Internet. You will get a secure storage space where you can run your business. Anyone with internet access can have access to your website. So go for hassle-free hosting and choose a cheap web hosting plan in Nepal.
- SSL Certificate
SSL Certificate is the security layer for your website so that you are trusted with confidential information like credit card numbers and other personal information. You can easily install SSL on Cpanel.
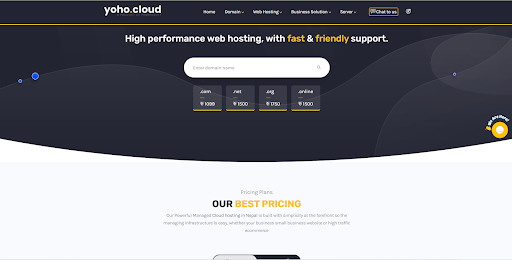
Are you worried about your e-commerce website and its hosting plan? Not to worry, Yoho.Cloud is the great solution to your problem. It is one of the powerful managed web hosting in Nepal built with easy managing infrastructure, suitable for both small business websites or high traffic eCommerce. It offers a free domain name, a free SSL certificate, and a different eCommerce hosting plan that best suits you.
Step 1.1 Steps to get your domain name, hosting, and SSL with Yoho.Cloud
- Go to the Yoho.Cloud website.
- Search for a domain name you like to have for your eCommerce website in the search bar and enter.
- It will redirect you to portal.yoho.cloud where you can check if the domain is available or not and choose your choice of extensions and register your domain name.
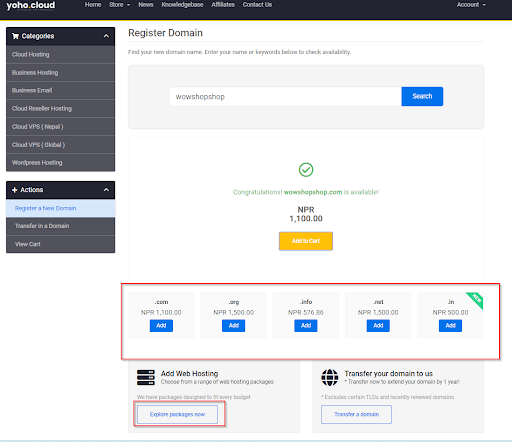
- Then below you can see the Explore the packages now button.
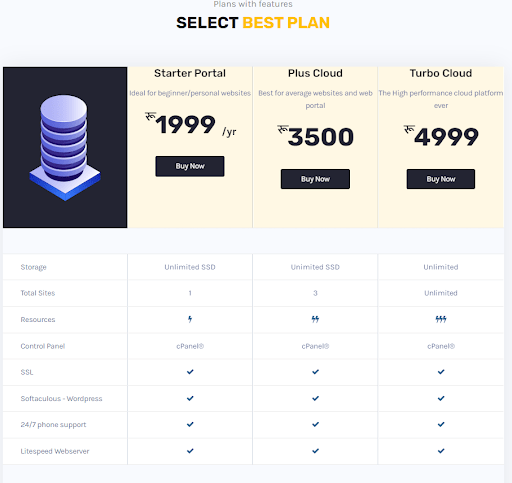
- You can see the different packages that you need or you can decide by comparing the options.
- Choose one and click the Order Now button to proceed.
- Then, you can enter your domain and set up your domain name. Don’t forget your domain name will be your website’s address. Once you confirm your domain hosting, it shows the Review and Checkout window. There you can check and confirm your purchase.
- After that, the final step is to finalize the package information and enter your account information to complete the process.
 Once the process is completed, you will get an email with credentials to log in to your web hosting control panel i.e, https://portal.yoho.cloud/. You will manage your entire website from cPanel. If you are not aware of using cPanel, check out the Complete Guide to cPanel for Beginners.
Now, you will log in to the cPanel. You will see that WordPress is already installed by Yoho.Coud. If not you can learn How to install WordPress using Softaculous?
Once you learn WordPress installation,
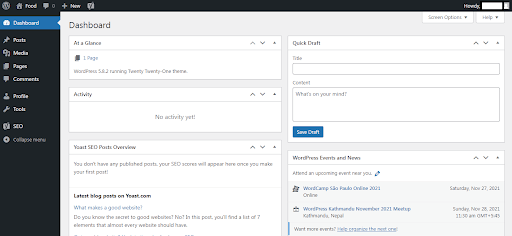
Click on the ‘Log in to WordPress’ button and it will take you to your WordPress site’s dashboard.
With this, you have completed your hosting and domain setup. Now, you need to set up your WordPress and online store.
Step 2: Steps to Set up your WordPress
Follow these steps to set up your WordPress website.
Go to Settings » General page and enter your WordPress site title and description.
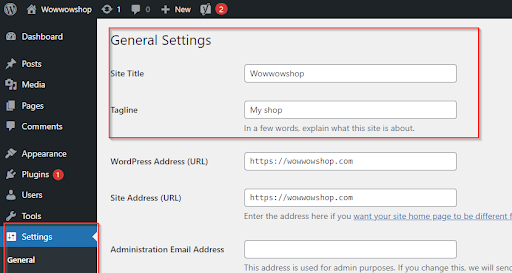
It is better to use your store name as the site title. For example My Demo Shop. The description part, i.e., the tag is optional.
Step 2.1 Configure HTTPS to use SSL
SSL certificate comes free with your WordPress hosting package. It is already installed for your domain name. You just need to configure it with your website so it appears as HTTPS rather than HTTP. As we already know, HTTPS is more secure.
Go to the Settings » General page and enter your WordPress Address and Site Address to use HTTPS instead of HTTP.

Make sure to click on the Save Changes button to store your settings. The first part of your WordPress is complete. Now, we will set up your eCommerce website.
Step 3: Steps to Set up your WooCommerce Store
WooCommerce is known as the best online store builder on the market among users and non-users. It gives you full flexibility to sell any type of product you want.Yoho.Cloud provides best woocommerce web hosting in Nepal at affordable cost and optimum speed.
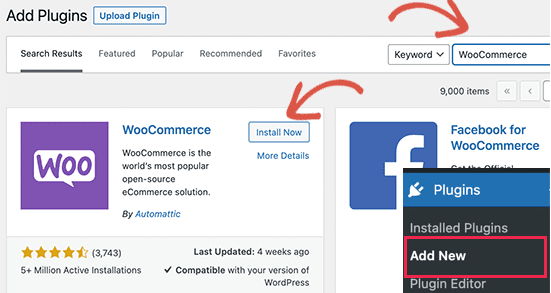
The first step is to install and activate the WooCommerce plugin. Go to Plugins » Add New page and search for WooCommerce. Click on the Install Now button.
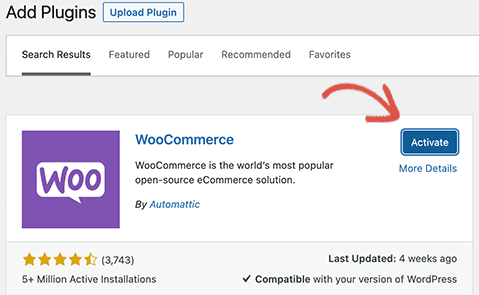
WordPress will install the WooCommerce plugin and click on the ‘Activate’ button to continue.
Then, you will see a wizard that says Welcome to WooCommerce screen. The setup wizard will guide you to make some settings for WooCommerce.

First, fill up the basic information like address, city, country, and region. You can also add your retail location information as the address if you have one.
Then, click on the Continue button.
After that, you need to select the store industry. You can always find the industry that is closest to the store type you want to start.
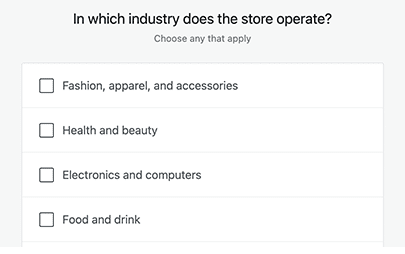
After that, click on the Continue button.
Then, you will be forwarded to the next page and there will be a question “What type of products will be listed”? Here, you will choose the product that you want to sell on your eCommerce website or store.
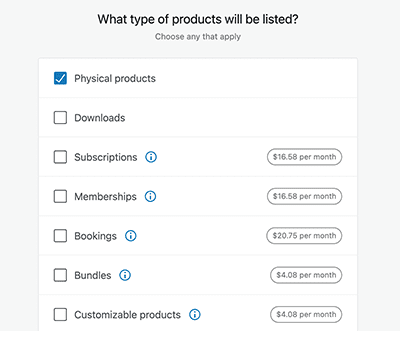
You can always choose multiple product types. For example, you can choose physical products that require shipping.
Then, click on the Continue button to go to the next page.
After that, you need to provide some business details for instance how many products you are planning to sell and if you are selling elsewhere or not. You can select “I don’t have products “as an option. Then, click on ‘No’ for the other option.
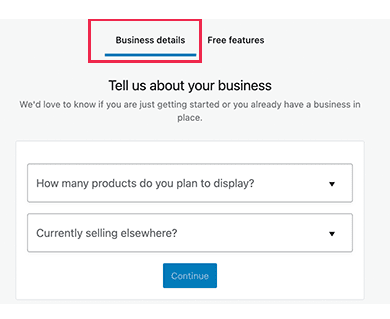
The next step is to click on the ‘Free Features’ tab. You’ll see a box that is pre-checked to install free features for your website. You can uncheck this box because it will install various WooCommerce extensions that you may not even need. But if you need them later, then you can always install them on your own.
Now, click on the Continue button for the next step.
Here, you can choose the theme for your website. You don’t have to choose the perfect theme at the first step. You can always set up the best theme for your website later.
Finally, you have completed the basic WooCommerce Setup. Now you have to set up the payment options for your users.
Step 4. Set Up Payments for Online Store Website
WooCommerce provides multiple payment gateways that you can easily set up to accept online payments in your store.
Click on WooCommerce » Settings page and go to the ‘Payments’ tab. You can choose either Cash on Delivery, PayPal Standard, Bank Transfers, or Checks.

Step 5. Adding Products to Your Online Store
The next step is to enter your store’s products into your eCommerce website.
Go to Products » Add New page to add a new product.

Now, enter the title for your product and then some detailed description.
On the right side of the screen, there is the ‘Product Categories’ menu. You have to click on the ‘Add New Product Category’ button and create a different category for your different products.
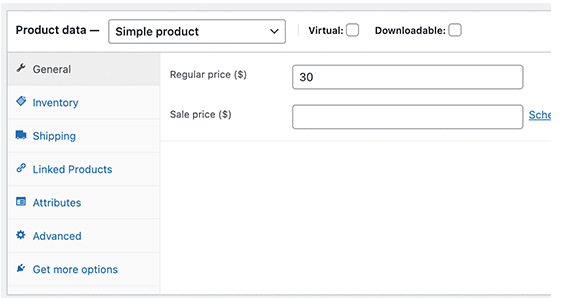
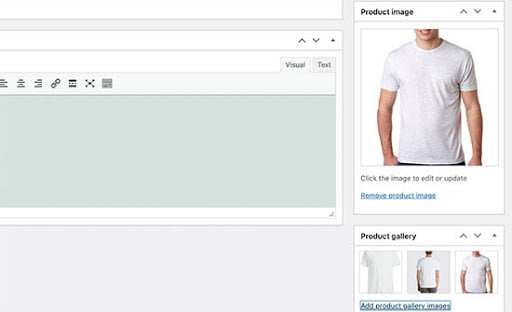
You need to scroll down on the screen and you will find the Product Databox. Here you will provide product-related information like pricing, inventory, shipping, etc.
Now, look at your right-hand column. There are boxes where you will add the main product image and a product gallery.
After you have completed adding all products and information, click on the Publish button to make it live on your website.
Remember you can always change your theme for the website, add new products and make many changes as per your need and desire. Explore your creative mind and choose what is right for your website.
Thereby, you are ready with your eCommerce website. Enjoy your website by following the above few steps to make an eCommerce website within a few minutes.

Configure domain-based emails in Android and in Mac Mail
Editorial StaffHow to migrate websites to a new host manually?
Editorial Staff