

Contact
Kathmandu,Nepal
9745652548 / 49
Table of Contents
We have already discussed cPanel and so many features provided by cPanel in our previous blog. You can check them out. Here we will discuss how to install SSL on cPanel.
Before that, let’s know what SSL is? SSL stands for Secure Socket Layer, a piece of code used by a web server to communicate securely with any internet client or browser. An SSL certificate provides encryption to ensure that traffic between client and server is secure and cannot be stolen.
So, you need to make sure your website has SSL or not, and your hosting provider does not provide SSL certificates.
Not only this, with an SSL certificate on your website, you may get rank higher in search engine rankings, customer trust will also increase, and ultimately potential sales will rise.
Here in this article, we will discuss the different method of installing SSL on CPanel and its depends upon your providers.
Installing SSL Via AutoSSL ( SSL/TLS Status )
Follow the steps below to install SSL via AutoSSL:
- Go to your cPanel and scroll down to the Security section.
- Select SSL/TLS Status.

- To install an SSL on a domain, select the domain(s) you’d like to do and click Run AutoSSL.
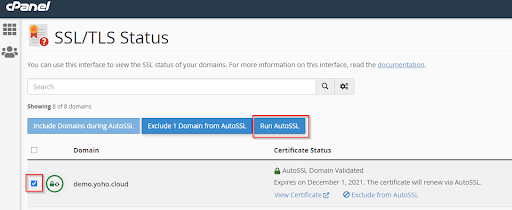
- The AutoSSL process will take some time to complete. A success message will appear on the page when it completes successfully.
- As a result, it usually takes a few minutes for polling to occur, but it may take as long as a day (since there are limits to the number of requests that can be made per day). CPanel will next automatically check Comodo for new certificates. You will then have a valid AutoSSL for your domain once it has been completed.
For further assistance, please get in touch with our technical support team if more than 36 hours have passed without AutoSSL being installed.
A failure notification will be displayed if AutoSSL encounters any errors. A domain name “demo.yoho.cloud” doesn’t resolve to an IP address. For AutoSSL to run correctly, the DNS records of that domain must be updated.
Installing SSL Via Let’s Encrypt
Bringing you Let’s Encrypt, the Internet Security Research Group (ISRG) offers it free, automated, and open certificate authority.
Let’s install SSL manually using Let’s Encrypt but before that, meet the following criteria:
- cPanel IP addresses should be used for both the domain and its www subdomain. Else the certificate won’t be verified and cannot be installed on your domain.
- The domains should be either pointed to your cPanel account or temporarily unparked until installation is complete.
Steps to follow for Manual SSL installation- Let’s Encrypt
- Go to cPanel, under the ‘SECURITY’ area, click on Let’s Encrypt SSL.

2. Then select your preferred domain and click ‘Issue‘ under Actions.

3. In the next window, you will have multiple Domain options. For better understanding, we’ll explain each one.
Include Wildcards? Only choose this option if you want a Let’s Encrypt Wildcard SSL that covers *.yourdomain.com. Ensure that you select the DNS-01 validation method first before including wildcard domains.
Add cPanel subdomains? – This is optional.
4 .Select a method of SSL validation:
http-01 – Recommended to use HTTP validation method.
dns-01 – If the nameservers of your domain point to cPanel, you can use the DNS validation method.
For wildcards, you MUST use the DNS validation method.
5) After choosing the validation method, click ‘Issue’.
Thus, in this way, you will manually install the SSL certificate using Lets Encrypt.

How to Setup a Domain Redirect in cPanel?
Editorial StaffRedirect HTTP to HTTPS using .htaccess
Editorial Staff