

Contact
Kathmandu,Nepal
9745652548 / 49
Table of Contents
CDN refers to the content delivery network which plays a vital role in speeding up a website. Website Speed has been one of the most concerning factors for websites. And among many ways to increase website speed performance, CDN is one of the most important ways.
So, in this blog, we will learn how to install CDN for your website.
- One is QUIC.cloud CDN
- CloudFlare CDN
How to Speed up Your WordPress Website Using QUIC.Cloud CDN?
QUIC.cloud is the only CDN that enables caching of dynamic WordPress pages. Your website will be more secure and faster through QUIC.cloud’s transfer protocol. This CDN works on the LiteSpeed Cache plugin within WordPress hosting for flexible caching of dynamic pages.
LiteSpeed Cache for WordPress automatically purges and syncs data in the CDN when necessary, and it’s more efficient than BunnyCDN and Cloudflare.
Additionally, QUIC.cloud has a few other really useful services, including:
- Image Optimization
- Page Optimization
- and Low-Quality Image Placeholders
How to Setup QUIC.cloud on WordPress?
Learn how to set up QUIC.cloud on WordPress to speed up your website by following the following steps:
Step 1: First, you need to install the LiteSpeed Cache plugin on your wordpress website.
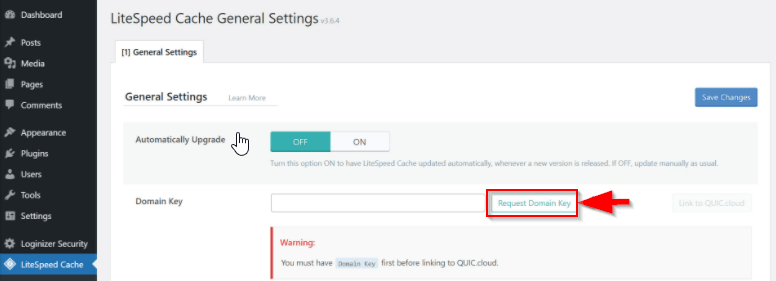
Step 2: Once you install and activate the LiteSpeed Cache plugin, Click on the LiteSpeed plugin and Click on General.

Step 3: The window appears. Click on Request Domain Key and wait for a few minutes and then reload the page there you will see the domain key.
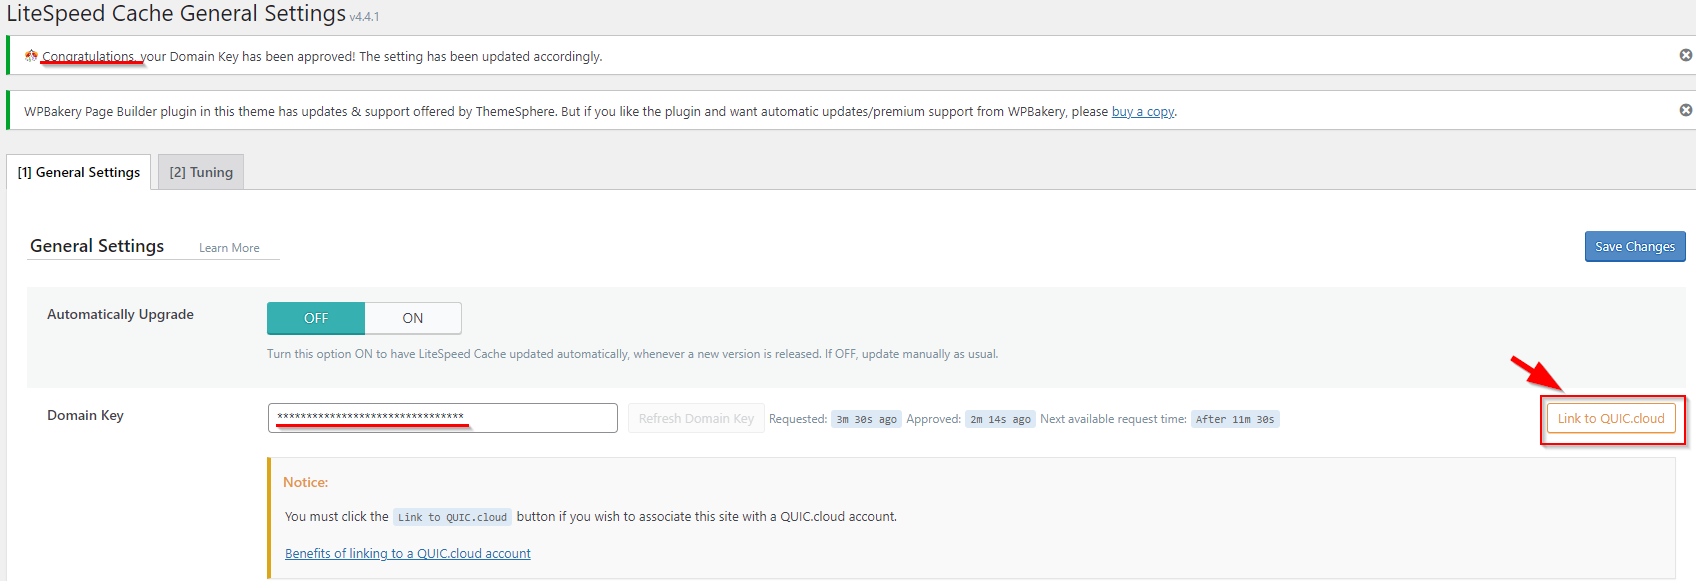
Step 4: Click on the Link to QUIC.cloud button.
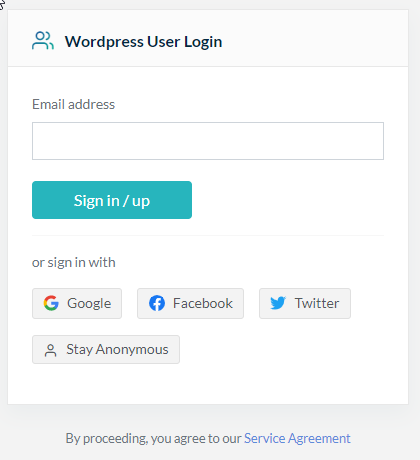
Step 5: The QUIC.cloud sign-in window appears. If you already have a Quic.cloud account then you can directly sign in else you need to signup for an account.
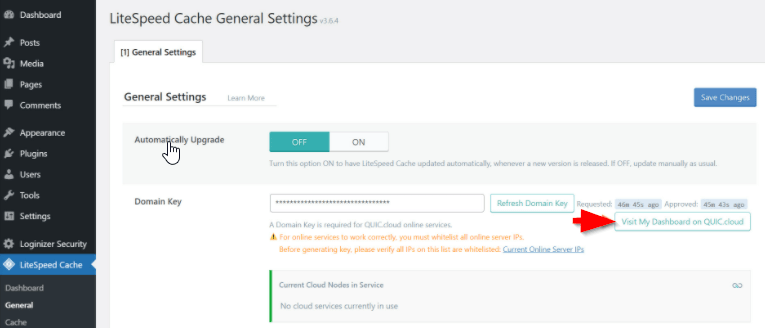
Step 6: Once you sign in to your QUIC.cloud account, then go back to the wordpress dashboard in LiteSpeed Cache > General.
Step 7: There you will see the Visit My Dashboard on QUIC.cloud button which shows you have successfully paired your WordPress website with QUIC cloud account.
For a domain to use QUIC.Cloud’s CDN, its DNS must be properly configured.
How to configure QUIC.Cloud CDN using their Nameservers?
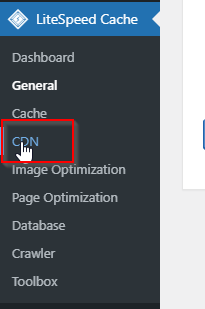
Step 1: Click on the LiteSpeed Cache Plugin and select CDN.
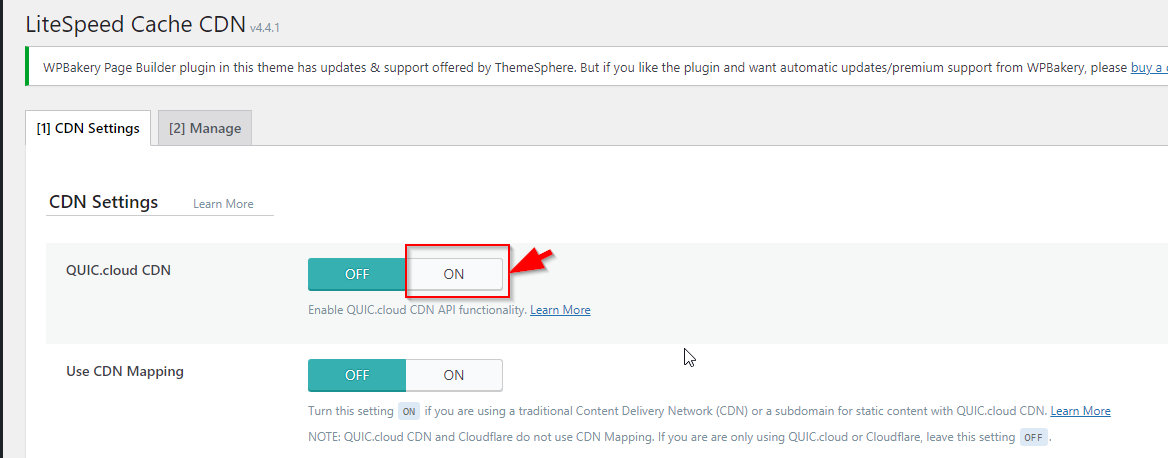
Step 2: The CDN page appears. Click On under the QUIC.cloud CDN setting to enable it and click the Save Changes button.
Step 3: Log in to your QUIC.Cloud Dashboard, and you’ll see a list of the domains you’ve linked to your account.
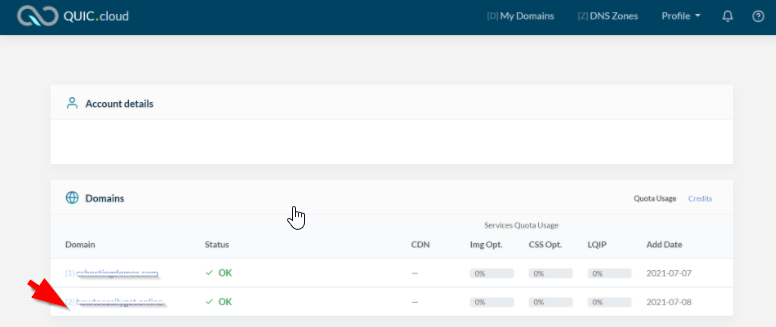
Set up the CDN for the domain you want to use.
You will see a list of Services for this domain.
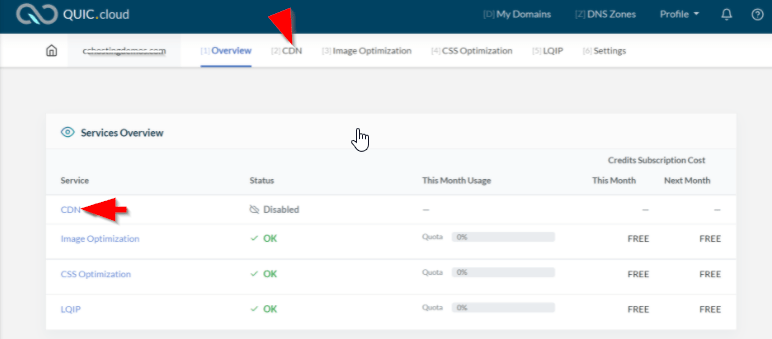
You can open the CDN area of the Dashboard by clicking CDN at the top of the screen or by clicking in the list of services.
Then the CDN tool will open.
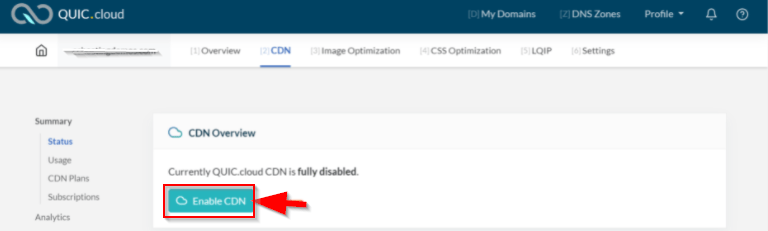
Click on the Enable CDN button to turn on the CDN feature.
Step 4: Then the Below screen appears. Choose the 3rd option – I want to use QUIC.Cloud DNS and press the Confirm Choice button.

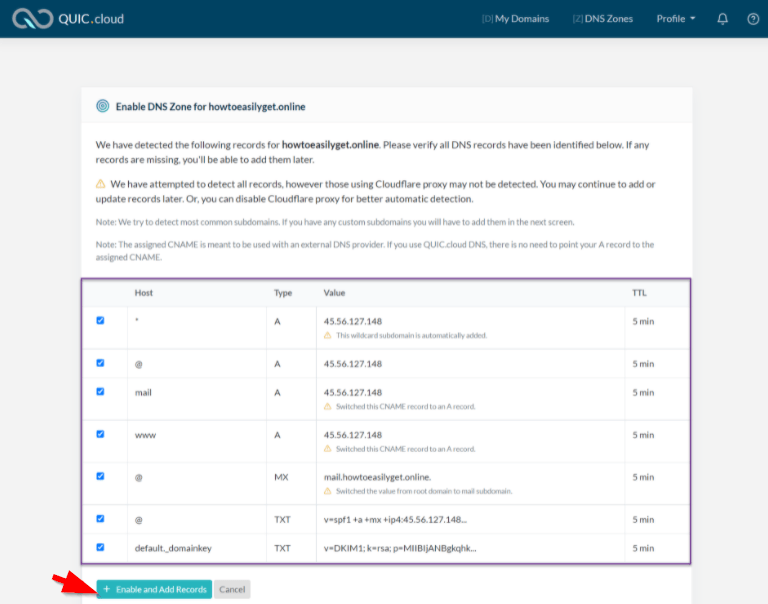
Step 5: You will see the QUIC.Cloud tool scans your DNS records
QUIC.Cloud creates a carbon copy of all of your DNS records from the zone file that was hosted by YohoCloud. The next screen will show you a list of those DNS records.
Step 6: Ensure that all records are on the list. Next, click the + Enable and Add Records button.
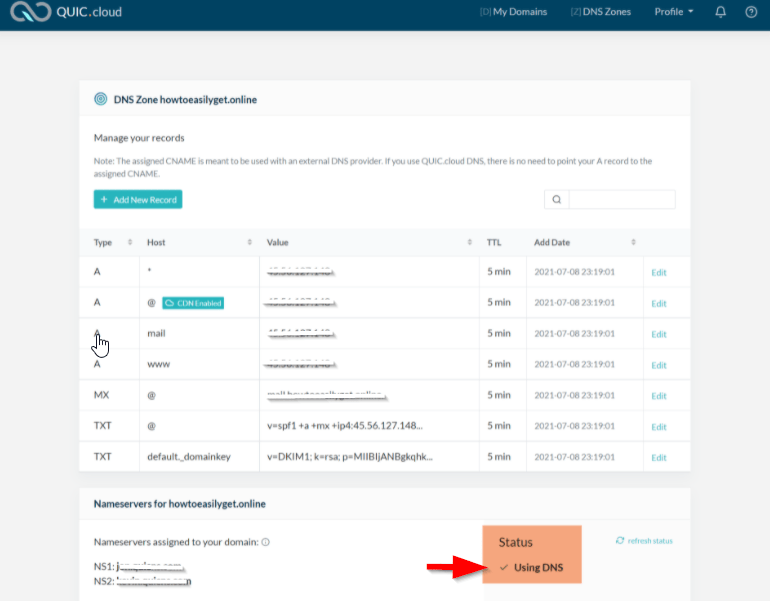
After you add a domain to QUIC.Cloud, you will be taken to the Domain Dashboard. Note the nameservers assigned to your domain.
QUIC.Cloud requires you to log in to your domain registrar and change the nameservers for the domain to those provided by QUIC.Cloud.

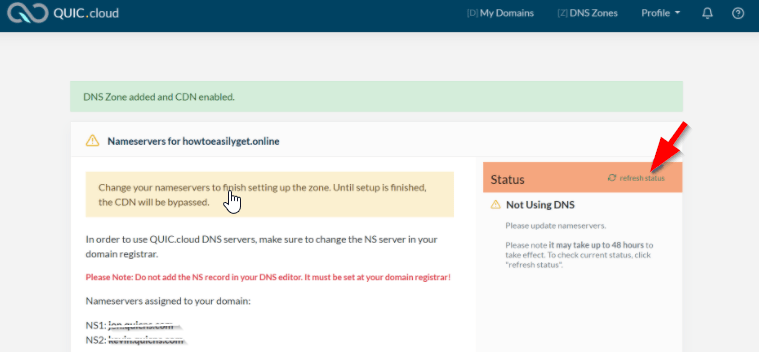
Step 7: QUIC.Cloud requires you to refresh your DNS setup after you change the nameservers at your domain registrar. Go back to your DNS Setup page and click the ‘Refresh Status’ button to do so.
The QUIC.Cloud systems may take 48hrs to detect you are using their name servers but it sometimes takes 20 or 30 minutes.
If you see this, your nameservers have been updated:
That’s all your website is connected with QUIC.Cloud CDN!
Cloudflare
Among the most popular content delivery networks, CloudFare is one of the free and popular CDN which stores static content on multiple servers around the world. Cloudflare CDN usage reduces user latency by caching and serving content from the nearest server. Ultimately, it leads to reducing website speed. So, use only that web hosting plan which offers Cloudflare, like YohoCloud.
The Cloudflare platform provides a number of features, including a CDN, caching, optimization, and more. Cloudflare is one of the most used CDN for wordpress websites. So let’s learn how to install Cloudflare on the WordPress website here.
How to Cloudflare CDN in WordPress?
Follow the steps below to set up Cloudflare CDN in WordPress:
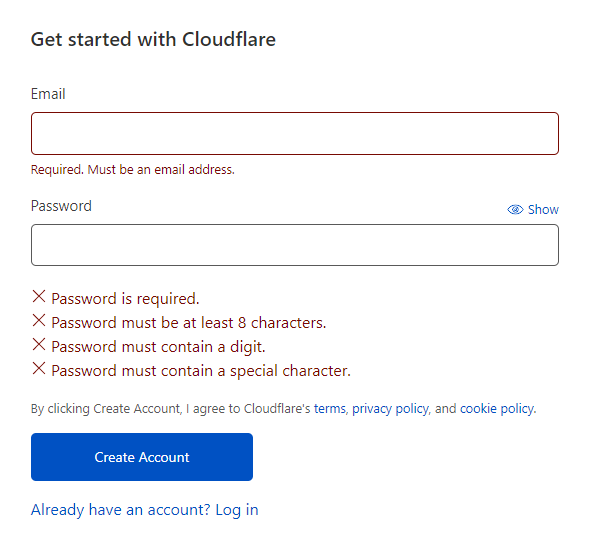
Step 1: Create an account in Cloudflare. Enter an email address and password and click on the Create Account button.
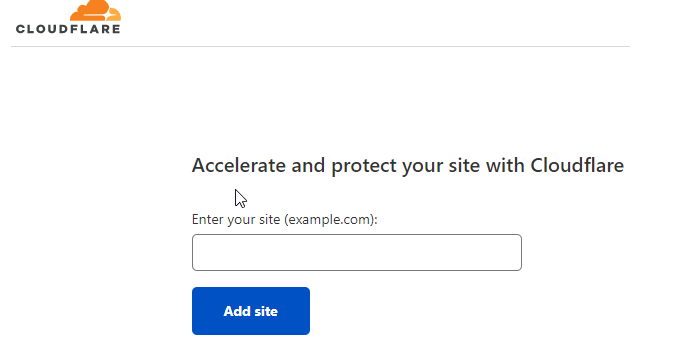
Step 2: Once you create an account, the below screen appears where you have to add your website address.
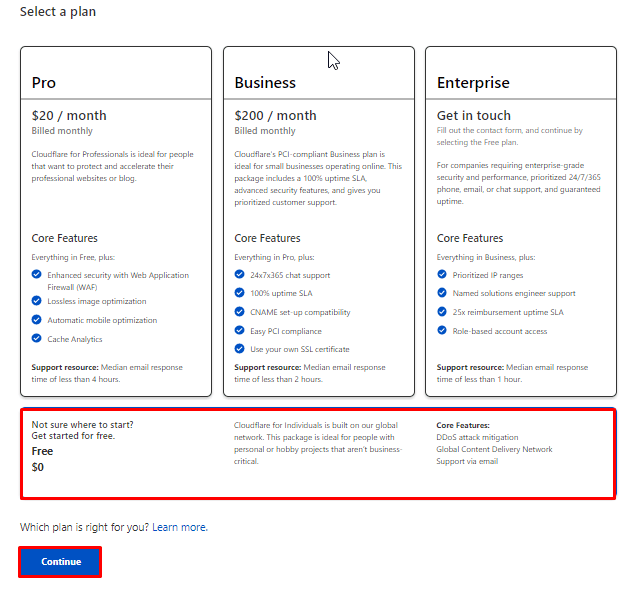
Step 3: Choose a free plan and Continue.
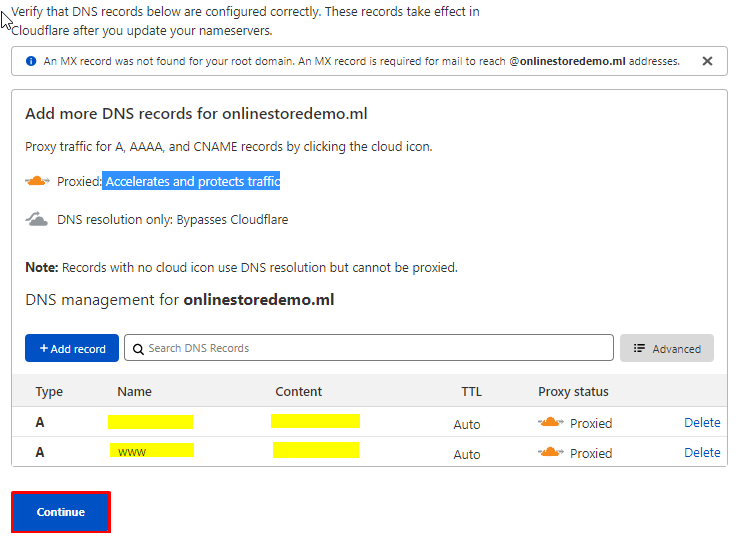
Step 4: Next, Check DNS records are configured correctly or not and click Continue.
Step 5: Replace your domain registrar’s nameservers with Cloudflare.
Step 6: Log into your domain registrar and update the name servers. Click on Change Nameservers.

Step 7: Then return to the Cloudflare CDN Settings, then check the nameservers. A Quick Start Guide screen will appear. Click the Get Started button.

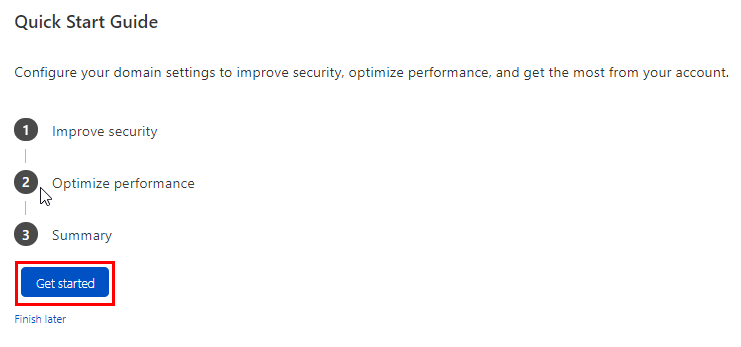
Step 8: Configure your domain settings for better security. Improve Security is the first section and it has two sub-sections — Automatic HTTPS Rewrites and Always use HTTPS. You can choose default security configurations and click on Save.
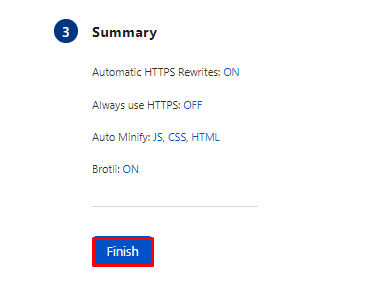
Step 9: Second setting is Optimize Performance includes two sub-sections; Auto Minify and Brotli. Choose all the options for Auto Minify, and for Brotli to speed up the site.

Note: Make sure if you choose minification on Cloudflare, then cancel it on Breeze or any other Cache plugin as it may cause issues if used at multiple places.
Step 10: The screen will appear. Click Finish.
Step 11: On your Cloudflare dashboard, you will see the message “Great news!”. Cloudflare is now protecting your site”. Your status will change to “Active,” and you will be able to access a number of options on the top panel for configuring various security and performance-related settings.
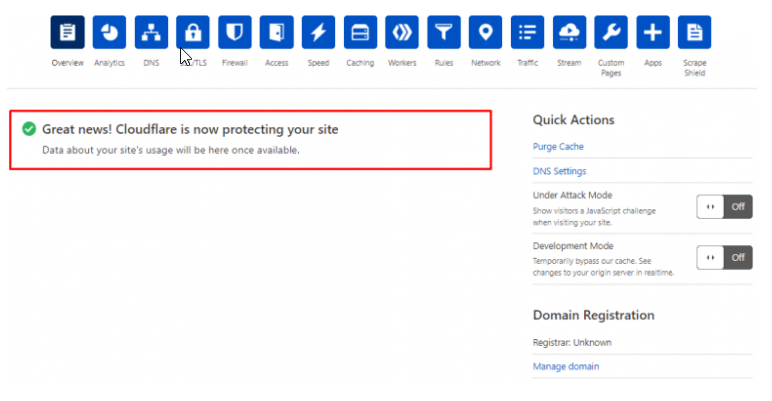
For WordPress websites, the Cloudflare plugin should be installed to ensure the most benefit from Cloudflare.
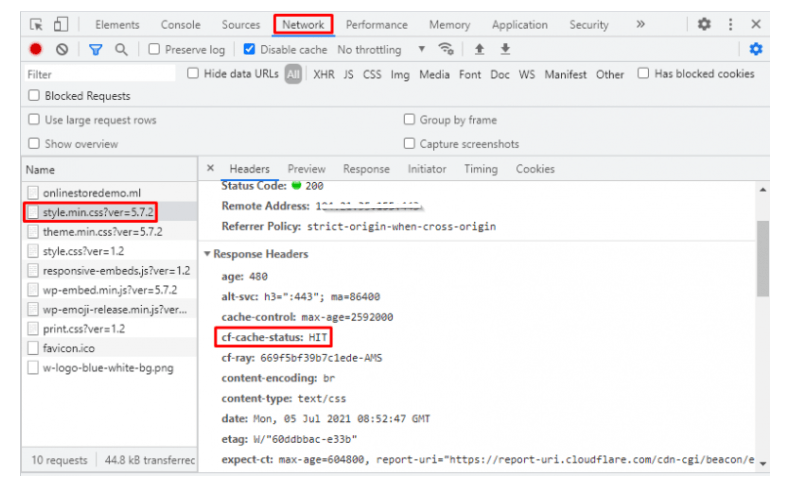
Step 12: Finally, verify whether your Cloudflare CDN is working or not. For that, go to the WordPress site on any browser > press “Ctrl + Shift + i” > Network. Next, refresh your page so you can see requests for your site. Select one of the requests and check “cd-cache-status”. Your CDN is working fine if you see HIT.
Therefore, like this, you can install CDN for your website and speed up your website performance.

Ways to Increase your Website Speed and Performance
Editorial StaffTop 5 cheapest and best web hosting plans in Nepal
Editorial Staff