
Contact
Kathmandu,Nepal
9745652548 / 49
Table of Contents
The Blogger is a free blogging tool offered by Google which is used to write blog posts. The subdomain of blogspot.com is usually used to host blogs (for example, www.yoho.blogspot.com). However, custom domains (like www.yoho.cloud) can also be hosted on Blogspot.
So if you are planning to start your blogging site, what could be a better deal than free site hosting? Get started with free and then scale it up later. Once it goes better, you can start with a custom domain (something like “www.yoho.cloud” instead of “www.yoho.blogspot.com”) because a blog with a custom domain looks more professional.
Thereby, if you want a custom domain for your blogger blog, you can set one up. You need to take several simple steps to link your domain to your blog, but before that, you need to purchase a domain name you like and then redirect your blog to the new domain by following the instructions that we will discuss below.
Many people tend to type the domain name, including www, when typing a domain. On Blogger, the www differs greatly from a hosted website; it is the CNAME (Canonical Name). Therefore, you need to understand the difference and take it seriously.
It is OK to open the Blogspot custom domain without entering a www, as long as the blog is auto-redirecting. If not, you are not making full use of a Blogger custom domain. This is because it will not open without the www prefix.
Prerequisites to connect a domain to Blogger
Here are the prerequisites to connect a domain to Blogger:
- Create a blogger account.
- Get a domain you like.
- Access to the Client area of YohoCloud, i.e., https://portal.yoho.cloud/login
How to connect the domain to Blogger?
There are two ways to connect the domain to Blogger. They are:
- Using Yoho.cloud DNS
- Using Cloudflare DNS
You will find all the steps to connect the domain to Blogger below:
1.1 Using Yoho.cloud DNS
Follow these steps to connect a domain to Blogger using Yoho.cloud DNS
Step 1: Log on to blogspot.com using your Gmail credentials.
Step 2: Create a blog title and domain name for Blogspot.
Step 3: Go to Settings > Scroll down and go to Custom domain.

Step 4: Click on Custom domain, and a popup like below appears.
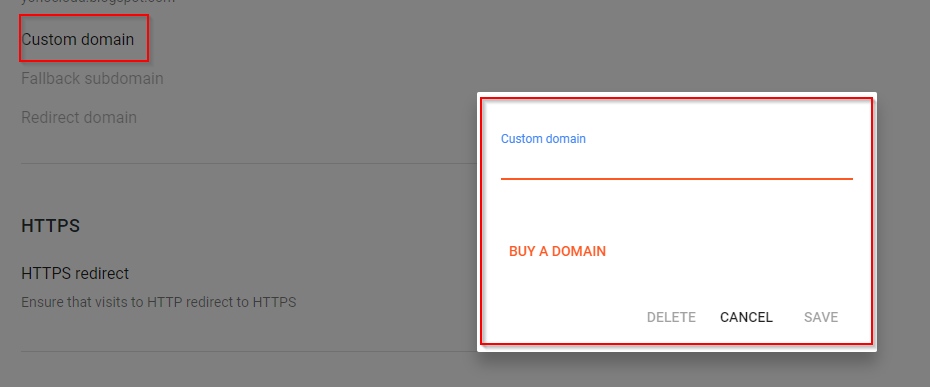
Step 5: Add a custom domain (E.g. www.blog.yohocloud.com).
Step 6: Click on Buy a Domain (if you don’t have one) and Save.

Step 7: Visit your Yoho.cloud client area where you can manage your DNS settings.
Step 8: Click on Domains > My Domains, and a list of domains appears. Select one and click on three dots and choose Manage Nameservers.

Step 9: Then the below screen appears. Enter the two CNAMEs from the Blogger dashboard (shown in Step 6) on this screen.

| Name, Label, Host | Destination, Target, Address, Points to |
| www | ghs.google.com |
| lkwl3z2tk6qj | gv-t35dut2nm73qmh.dv.googlehosted.cm |
Please do not copy these two entries. They are verification codes, and they differ for every blog. You can find your CNAMEs in your dashboard.
Step 10: Adding these four A-Records corresponds to four different Google IP addresses.
| Name, Label, Host | Destination, Target, Address, Points to |
| @ | 216.239.32.21 |
| @ | 216.239.34.21 |
| @ | 216.239.36.21 |
| @ | 216.239.38.21 |
Step 11: Once the DNS has been propagated fully; the custom domain can be saved. Otherwise, an error message appears.
It takes a while for DNS records to propagate. It can take up to 48 hours for DNS records to propagate.
If you face any problem, you can contact us; YohoCloud is 24*7 there to help you.
1.2 Using Cloudflare DNS
You can also connect your domain to Blogger using Cloudflare DNS. To know how to follow the below steps:
Step 1: Go to your hosting provider’s client area and click on My Domains.
Step 2: A list of domains will appear. Click on the checkbox of the domain you want to connect with Blogger and click on 3 dots, and select Manage Nameservers.

Then the below screen appears.
Step 3: Go to Cloudflare and log in.
Step 4: Then, you will see the below screen and click on Add a site.

Step 5: Add a website name you want to connect and click on the Add site button.

Step 6: Below screen appears to select a plan. Choose the free plan and Continue.

Step 7: Screen like below appears. Click Continue.

Step 8: Then a screen appears providing Cloudflare’s nameservers like shown below. Click on click to copy and go back to your hosting provider’s client area to nameserver as shown in Step 2 where you have to replace it. Copy Cloudflare nameservers and paste them to your domain nameserver in each of the 2 fields.

Step 9: Click on Done, check nameservers from the Cloudflare window.
Step 10: Now, visit your Cloudflare dashboard. Choose DNS from the menu.

Step 11: The next step is to click add the records and choose CNAME.
Step 12: Then again go to blogspot.com > Settings and Add a Custom domain with www like shown below and Click Save. And the following text with red color will be displayed.
These red texts are all information that you need to fill up in Cloudflare.
Step 13: So fill these in Cloudflare tables as shown below.
Note: You need to add two records as two names and destination URLs are given.
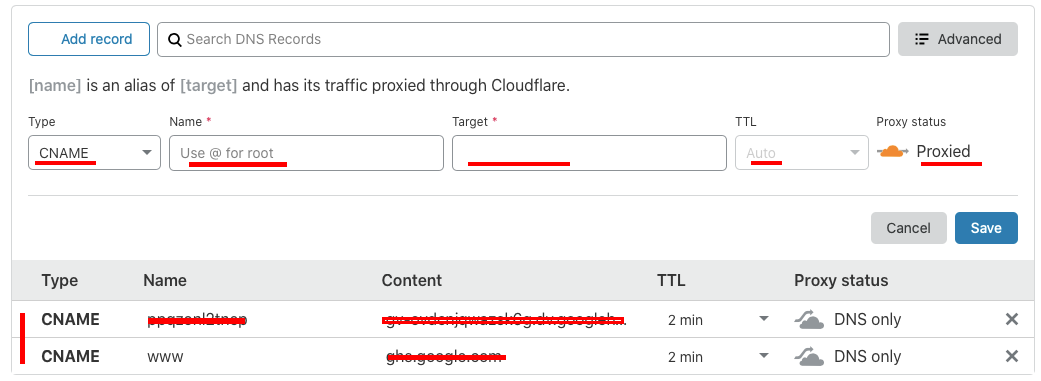
| Type: | Name: | Target: | TTL: | Proxy status: |
| CNAME | www | Destination URL that is given above in the red text. | Auto | Choose DNS. |
Step 14: Once this is finished, go back to blogspot.com and click Save.
Step 15: Then there you will see the Redirect domain and HTTPS.


Check back after another few minutes (minimum 30 minutes). Check blogspot.com, and you will see your domain connected to Blogger.
Thus, you can connect a domain to BLogger using either Yoho.cloud DNS or Cloudflare DNS, which we have discussed above.
Top 5 cheapest and best web hosting plans in Nepal
Editorial StaffConfigure domain-based emails into Outlook and Gmail
Editorial Staff