

Contact
Kathmandu,Nepal
9745652548 / 49
Table of Contents
Error logs are files that record details of errors and problems found in software applications, systems or devices. These logs include the source of the error, the time it occurred, the severity of the error, and other relevant information.
Error logs are essential for allowing employees and IT staff to quickly and efficiently identify and resolve issues. Error messages can be analyzed to identify the cause of the problem and suggest improvements to prevent future occurrences.
Some of the unique benefits of error correction include:
- Troubleshooting: Error logs are a valuable tool for troubleshooting software, systems, or hardware. They can help find the source of the error and determine the steps needed to resolve the problem.
- Debugging: The error log can be used to debug the code by identifying the location and nature of the error. Developers can use this information to fix bugs and improve overall software quality.
- Performance Monitoring: Error logs can be used for performance monitoring and error identification. This information can be used to improve system performance and improve user experience.
- Compliance – Error logs may be required for compliance purposes, such as regulatory requirements or industry standards.In short, error logs are important because they provide important information for diagnosing and solving problems in software, programs, or devices. By using error logs, developers and IT professionals can improve the quality and performance of their applications and programs, leading to a better user experience and increased demand.
If so, then this blog post is for you! We’ll show you how to quickly and easily check your error logs in cPanel, so that you can find the root of your problem and get back up and running.
Step 1: Login to cPanel
In order to check the error logs in cPanel, the first step is to log into cPanel. This can be done by navigating to the cPanel URL provided by the web hosting company and logging in with the username and password. Once logged in, users will have access to several tools and resources that can help them diagnose and troubleshoot any errors their website may be experiencing. From here, users will be able to view their cPanel error logs, PHP error logs, access logs, bandwidth logs, and cache logs. Analyzing these logs can help provide valuable insights into why errors are occurring on a website.
Step 2: View the cPanel Error Logs
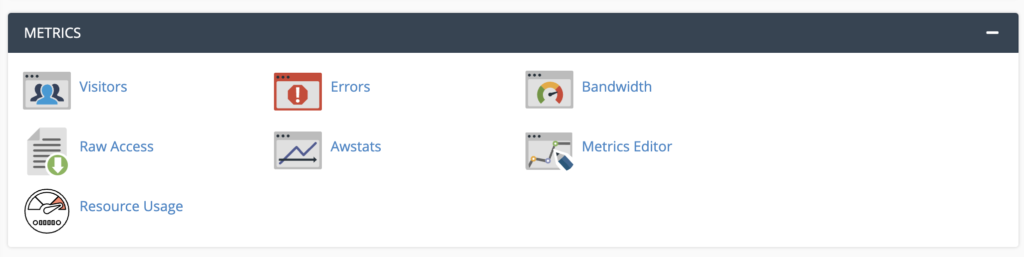 Once the user has logged in to cPanel, they can view the cPanel Error Logs by navigating to the “Metrics” section and selecting the “Errors” link or icon. This page will display the last 300 entries, or 2MB, of the server error logs. To make all of this data accessible, the user must check the error logs from their cPanel provided by their web hosting company. These error logs are divided into two different types: Apache Error Logs and PHP Error Logs. The Apache Error Logs will provide detailed information about server-side errors, while PHP Error Logs provide information about code errors on specific files and applications. By using the cPanel File Manager and text editor, users can open this file and view any error messages that have occurred. The most recent messages are located at the bottom of the file, making them easy to find.
Step 3: Access the PHP Error Logs
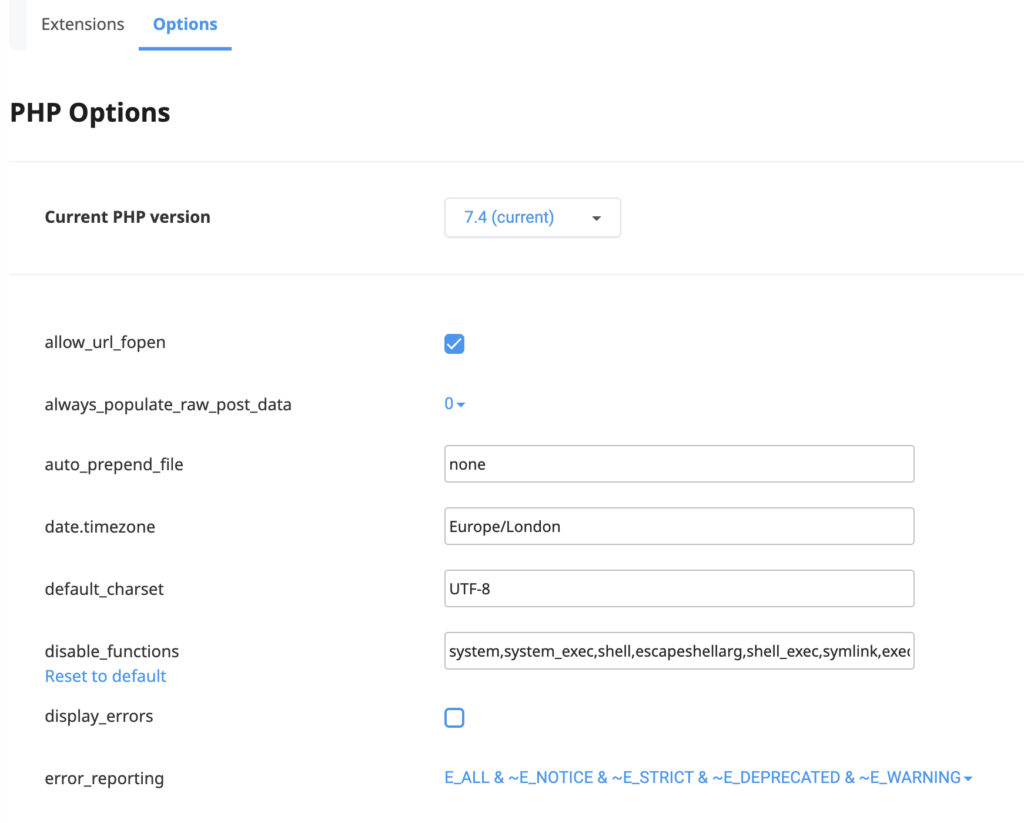 In Step 3 of how to check error logs in cPanel, users will need to access the PHP Error Logs. This can be done in cPanel by selecting the Select PHP version option from the SOFTWARE section. Once this is done, users will be able to open the php.ini file in their favorite text editor and locate the Error handling and logging section. Here, they should ensure that both display_errors and log_errors are set to On, as this will enable error logging to occur. Additionally, users should also ensure that the path for error_log is correct; if it isn’t, they can create a new log file using cPanel’s File Manager or by logging in via FTP. This will ensure that any errors or warnings that occur during the system transition process are logged and can be easily accessed and analyzed later on.
Step 4: Analyze the Logs
Once you have access to the error logs, it is important to analyze them in order to properly troubleshoot any problems. The logs contain detailed information about errors that have occurred on your site, including the date and time of the error, the code associated with it, and the URL or file that caused the error. Examining these logs can help you identify any potential issues with your website and take steps to fix them. Additionally, analyzing the logs can help you identify potential security risks and take preventative measures to ensure your site is secure. By taking the time to carefully analyze your logs, you can ensure that your website remains secure and functioning properly.
Step 5: Troubleshooting with the Error Logs
Once you have identified the issue in your error logs, the next step is to troubleshoot the issue. By checking through your logs, you can see which files have an error or warning associated with them. This can help you identify the source of the problem and fix it quickly. Furthermore, if you are seeing a pattern of errors or warnings, then it may be necessary to update some of your software or plugins. Additionally, checking for missing files or broken links will also help in resolving any errors. Once you have done all of this, it is important to check your access logs for any HTTP traffic and bandwidth logs for any excessive usage. Finally, checking your cache logs may also provide some valuable insight into how your website is performing. With all these steps in mind, it should become much easier to troubleshoot any issues with your website.
Step 6: Check for Missing Files and Broken Links in the Error Logs
When troubleshooting scripts and finding any missing files or broken links, it’s important to check the cPanel Error Logs. To do this, you must login to your cPanel and navigate to the Metrics section. From there, you can access the Error Logs Interface which provides a list of the last 300 errors that occurred on your server. Through this interface, you can analyze the logs to identify any missing files or broken links that may have caused errors. Additionally, you can use the error logs to troubleshoot other issues with your website such as slow loading times or incorrect settings in your .htaccess file. Checking the cPanel Error Logs is a great way to ensure that all of your website’s resources are functioning properly and that any potential issues are quickly identified and resolved.
Step 7: Check Access Logs for HTTP Traffic
In order to check access logs for HTTP traffic, log into the server as the root user and install cPanel & WHM. Once installed, users can then check their current network settings with the protocol enabled on most network equipment. Additionally, cPanel does log all http traffic to WHM, webmail, and cPanel access. All cPanel logs are located in the /usr/local/cpanel/logs directory. This information can be incredibly useful in troubleshooting potential problems and ensuring there are no missing files or broken links.
Step 8: Check Bandwidth Logs
In the previous steps, users were guided through the process of logging into their cPanel account, viewing the cPanel Error Logs, accessing the PHP Error Logs, analyzing the logs, troubleshooting with the error logs, checking for missing files and broken links in the error logs and checking access logs for HTTP traffic. Step 8 guides users to check their bandwidth logs. By checking their bandwidth logs, users can view information related to their total bandwidth usage. This data can be found in the ‘/var/cpanel/bandwidth’ directory. By doing so, users can keep track of their bandwidth usage and make sure that their website is not exceeding its allotted bandwidth limit. Additionally, users can view detailed breakdowns of the various services that are utilizing their bandwidth such as FTP, email and web traffic.
Step 9: Check Cache Logs
In Step 9, you can check the Cache logs to get more detailed information about the performance of your website. The cache logs provide information about the services accessed, the time taken for each request, and the success or failure of each request. This can help you identify any bottlenecks in your website’s performance and pinpoint any areas that need improvement. Additionally, analyzing your cache logs can help you identify any broken links or missing files that may be causing errors on your website. By ensuring that all of the necessary pieces are in place, you can ensure that your website is running smoothly and efficiently.
Conclusion
In conclusion, it is important to check error logs in cPanel regularly to ensure that your website is running smoothly and that any issues are identified and rectified quickly. By logging into cPanel, viewing the cPanel Error Logs, accessing the PHP Error Logs, analyzing the logs, troubleshooting with the error logs, checking for missing files and broken links in the error logs, checking access logs for HTTP traffic, checking bandwidth logs and cache logs, you can identify any potential problems with your website and make sure that it performs optimally.

What is CMS & CMS Hosting in Nepal ?
Editorial StaffPython Django Hosting in Nepal & its Deployment
Editorial Staff