

Contact
Kathmandu,Nepal
9745652548 / 49
Table of Contents
Are you looking to create an email address for your website? Are you a beginner and not sure where to start? Don’t worry, we have the perfect solution! In this blog post, we’ll show you how to create an email in cPanel quickly and easily. Keep reading to learn all the steps involved!
Introduction
Creating an email address in cPanel is a great way to set up a professional email address for yourself or your business. With cPanel, you have complete control over the setup process and can create an email address in just a few simple steps. In this guide, we’ll walk you through how to create an email address in cPanel and how to set up email forwarders. With this guide, you’ll be able to quickly get a new email address set up and ready to use.
Step 1 – Log in to cPanel
To start the process of creating an email account in cPanel, the first step is to log in to the cPanel. This can be done either through the web host’s control panel or directly through the URL. Once logged in, you will be able to access all of the features and functions of cPanel.
To log in, simply enter your username and password associated with your web hosting account. Once logged in, you will be presented with a dashboard that shows all of the available features and functions of cPanel. From here, you will be able to access the Email Accounts feature located in the Mail section.
Step 2 – Choose Email Accounts
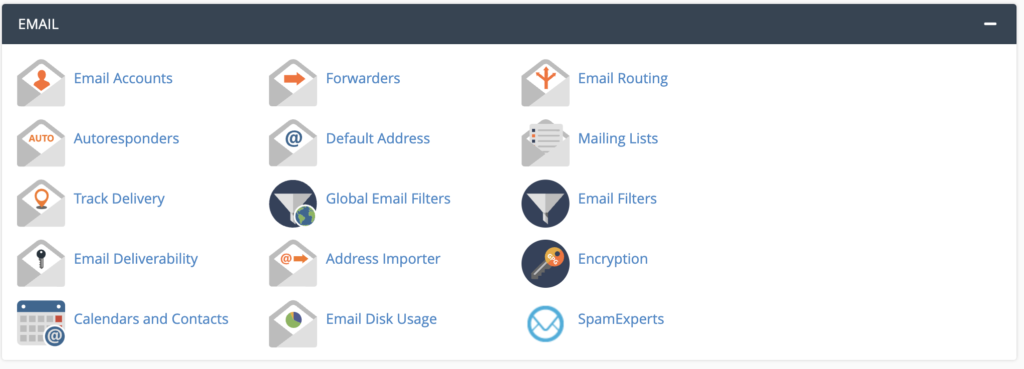
After logging into cPanel, click on the “Email Accounts” icon located in the Email section. This will bring up a list of all existing email accounts associated with your domain. From here, you can create additional accounts, set up email forwarding, and manage default email accounts.
First, you will need to decide which domain to use for the new account. You can choose from any of your current domains associated with your cPanel account. Then, enter a username for the new email address in the “Email” field.
The “Mailbox Quota” field allows you to set a storage limit for each mailbox, so that it doesn’t take up too much disk space on your server. You can adjust this value as needed by increasing or decreasing the value in the field.
Finally, create a password for the new email address and click “Create” to finish creating the account. Once this is done, you can start setting up email forwarders, creating aliases and managing default email accounts associated with your domain.
Step 3 – Enter a New Email Address
In Step 3, you will enter a new email address. In the “Email” field, enter the first part of the email address you would like to create. For example, if you would like to create an email address such as [email protected], then you would enter “info” in this field. Once you have entered the first part of your email address, click the “Domain” drop-down menu and select the domain that you wish to use for this account. Finally, enter the password that you wish to use for this account in the “Password” field and click “Create” to finish creating your new email account.
Step 4 – Choose Your Domain
Once you have logged into cPanel and chosen the Email Accounts option, you will be taken to a new page. On this page, you will need to enter the new email address that you wish to create. Then, you will be prompted to choose the domain for your email address. This is a very important step because it will determine the address of your email. It is important to ensure that the domain name is correct and relevant to your business or personal needs.
When selecting a domain, make sure it is one that you are familiar with and that it matches the name of your website or business. You can also create multiple email accounts with different domains if necessary. Once you have chosen your domain, click on “Create” and your new email address will be created.
Step 5 – Allocate Disk Space
In Step 5 – Allocate Disk Space, users can set the amount of disk space they want to allocate to their email address. This will limit the total size of all emails that can be stored in the mailbox. To set the disk space quota, select the desired quota from the “Disk Space Quota” drop-down menu. The available disk space quota ranges from 2MB to 4096 TB (4 PB). After selecting a quota, click the “Change Quota” button to save the new settings.
It is important to note that disk quotas are not retroactive and cannot be set higher than 4096 TB (4 PB). This means that if you have an existing mailbox with more emails than your new quota allows, you will need to delete some emails in order to reduce your disk usage and stay within your new quota.
Step 6 – Create a Password
Step 6 – Create a Password
In order to complete the process of creating an email account in cPanel 6, you will need to create a password for the new account. On the email account setup screen, enter your password in the “Password” and “Password (Again)” fields. When creating a password, it is important to use a combination of uppercase and lowercase letters, numbers, and special characters for maximum security. Additionally, make sure that the password is at least 8 characters long. Once you have entered your password twice, click the “Create” button to finish creating your new email account.
Step 7 – Click Create
Once all the details have been filled out in the Email Accounts page, users can proceed to Step 7 by clicking the “Create” button. This will create the email account with all the details that were filled out in the previous steps. After a successful creation, users will see a confirmation message on their screen. It is important to remember that this step is required in order to complete the process of creating an email account. Once this step has been completed, users can now start using their newly created email account.
Step 8 – Set Up Email Forwarders
In Step 8 – Setting Up Email Forwarders, users can customize their email account by creating forwarders. A forwarder is a feature that will automatically redirect emails sent to the chosen address to another email address. This can be done in cPanel with the following steps.
First, click on the ‘Forwarders’ button in the ‘Email’ section. On the forwarders page, click ‘Add Forwarder’. Select the domain from the drop-down box and enter the username you want to forward emails from.
Next, enter the email address to which you want to forward emails in the ‘Destination’ field. If you want all emails sent to the username to be forwarded, leave this field blank. You can also choose whether or not you want to keep a copy of forwarded emails, as well as whether or not you want any additional actions to be taken when forwarding emails (like sending a copy of all emails forwarded to another address).
Finally, click ‘Create’ and your forwarding rule will be set up. You can manage your default email accounts and any additional forwarders in the same page by clicking on the ‘Manage Default Email Accounts’ button.
Step 9 – Manage Default Email Accounts
In Step 9, you will learn how to manage your Default Email Accounts. This feature is used to catch all emails sent to invalid addresses. To set up your Default Email Address, first open the cPanel® Webmail app for the selected account (single click/tap – no further login needed!).
Once in the app, click on the “Email” section and then select “Default Address”. You will be presented with a few options. First, choose the storage space for the email account – this is similar to setting up a regular email account.
Next, select the “Automatically Create Folders for Plus Addressing” option. This allows you to create a folder for each plus address that is associated with your email address. For example, if your address is [email protected], you can create a folder called “ john” where all emails sent to [email protected] will be stored.
Finally, make sure that you set up an Email Forwarder for each of your plus addresses. This will ensure that all emails sent to these addresses are automatically forwarded to your main email address. Once you have completed these steps, your Default Email Account will be ready to use!