

Contact
Kathmandu,Nepal
9745652548 / 49
Table of Contents
What is cPanel Hosting?
cPanel hosting is a web hosting environment where users manage websites, files, domains, databases, emails, and security via cPanel, a user-friendly, Linux-based control panel developed by cPanel LLC. Pre-installed in many shared and cloud hosting plans (e.g., Yoho Cloud in Nepal), it simplifies tasks like:
- Managing files and folders
- Creating databases and email accounts
- Installing CMS like WordPress via Softaculous
- Setting up SSL certificates and backups
cPanel’s centralized dashboard helps users automate complex server tasks, making it ideal for beginners and developers launching blogs or e-commerce sites.
Key Benefits of Using cPanel Hosting
- Easy-to-use dashboard with no coding required
- Quick CMS installs (WordPress, Joomla, Drupal, etc.)
- Built-in tools for email hosting, domain management, and SSL
- Softaculous App Installer for 1-click script deployment
- Integrated backup and restore options
- Access to advanced tools like File Manager, FTP, and Cron Jobs
Most cPanel hosting plans also include free SSL certificates, automatic backups, and performance optimization tools, making them ideal for both first-time website owners and professionals.
While there are various other web hosting environments apart from cPanel, it remains the most popular one due to its high adaptability. You can compare cPanel vs. Plesk, or with another popular alternative with its own strengths and target audience to figure out what suits you the best.
Who Should Use cPanel Hosting?
cPanel hosting is perfect for:
- Beginners who want an intuitive dashboard without coding
- Small business owners who need fast setup and email hosting
- Developers managing multiple websites or applications
- Agencies or freelancers managing client sites
With its perfect combination of power, ease of use, and widespread support, cPanel hosting has become an industry standard for reliable and efficient website management.
Getting Started with Your cPanel Hosting Dashboard
Once your cPanel hosting account is active, you’ll land in the cPanel dashboard, through which you’ll be managing every aspect of your website and server. Whether you’re launching your first site or managing multiple projects, as you get familiar with the basics of the cPanel dashboard, managing your website becomes effortless.
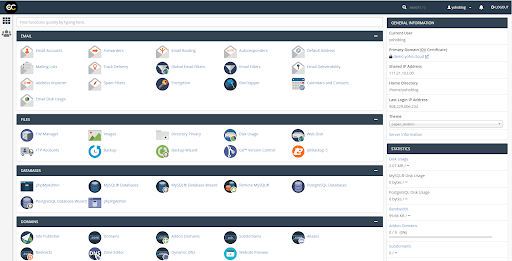
cPanel Hosting Dashboard: Jupiter Interface
cPanel Hosting comes with various themes, and the Jupiter interface is the most popular one, featuring a modern, mobile-friendly interface with logical grouping of tools and a search bar for quick access. It is highly optimized, responsive, and adapts smoothly to different devices.
It also allows you to pin frequently used tools, such as File Manager, Databases, and Email Accounts, to the top of your dashboard for faster access. This makes the interface more efficient and personalized.
Accessing Your cPanel Hosting
To start with cPanel, log in to your hosting account using the credentials provided by your hosting provider. Generally, it can be accessed through a direct URL like yourdomain.com/cpanel. Once you’re in, the Jupiter interface loads by default.
If you don’t see the new interface, you can switch manually:
- Navigate to the General Information or Preferences panel
- Look for the Theme dropdown
- Select Jupiter and click Apply
If the Jupiter option isn’t visible, you can contact your hosting provider and they’ll enable it on your account.
Navigating the cPanel Hosting Dashboard
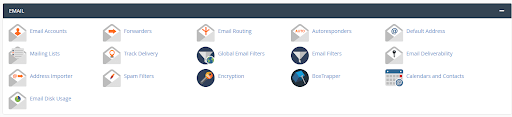
The cPanel Hosting dashboard is divided into key modules, including Files, Databases, Domains, Email, Software, and Metrics. Each module contains various tools relevant to that category. For instance, under “Files”, you’ll find the File Manager, FTP setups, and backup options.

Similarly, you can create inboxes, manage spam filters, and more in the “Email” section.
Moreover, if you want to avoid the endless search for your desired tool, you can use the search bar located at the top of the page to find any feature quickly. You can type in “PHP”, “Email”, or “MYSQL” and access them. The search feature becomes particularly helpful when managing multiple domains or projects.
Getting comfortable with the cPanel Hosting dashboard, especially with the Jupiter interface, you can gain better control over your website environment. It enables efficient domain setups, email management, and app installation in just a few clicks.
Next, we’ll explore how to utilize core cPanel tools, including File Manager, Email Setup, and Softaculous, for one-click app installations.
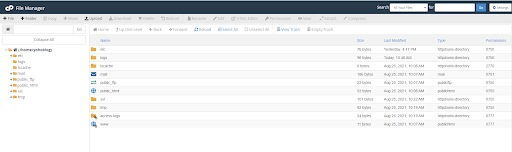
Managing Files with cPanel Hosting File Manager
Managing your website’s files directly from the cPanel File Manager is a common task for both beginners and advanced users. With the latest Jupiter interface, cPanel has made file handling more intuitive, visually clean, and mobile-friendly, eliminating the need for FTP tools in most day-to-day tasks.
Understanding the public_html Folder
The very core of your File Manager is the public_html directory, the root folder where your website’s files live. Any content you upload here is publicly accessible on the web. For example, if you upload index.html to this folder, it will load when someone visits your domain.
This is also the folder where:
- CMS files (like WordPress) reside
- Static website files (HTML, CSS, JS) are stored
- Assets such as images or documents should be organized into subfolders
Keeping your public_html organized ensures faster file retrieval, better security, and easier maintenance.
Uploading, Editing, and Deleting Files
The File Manager tool offers a simple GUI where you can:
- Upload: Easily upload HTML, PHP, image files, and even zipped site backups via drag-and-drop or file selector.
- Edit: Right-click any file and choose between Code Editor (for syntax-highlighted editing of HTML/PHP/JS/CSS) or Text Editor for plain content.
- Delete: You can soft-delete to the trash or permanently delete to save space.
This interface is beneficial when troubleshooting site issues or updating your website, as it eliminates the need for desktop tools or FTP access.
Compressing and Extracting Files
Do you need to deploy a whole website or back it up quickly? You can:
- Upload your website files in a .zip or .tar.gz archive
- Use the Extract function in File Manager to unpack it directly into the public_html folder
- Save storage by compressing old logs or unused folders using the Compress tool
This simplifies tasks such as migrating websites or deploying web apps without requiring complex CLI commands.
Code Editor vs. Text Editor
When it comes to in-browser editing, cPanel gives you two choices:
- Code Editor: Best for developers, it supports syntax highlighting, line numbers, and structure formatting, making it ideal for HTML, CSS, JavaScript, or PHP files.
- Text Editor: A minimal editor suited for plain text files or quick edits.
Both editors open in a new tab, allowing you to preview and save changes safely.
How to Back Up and Restore Websites in cPanel Hosting
Backups are a crucial part of website management, and it is essential to safeguard your data against accidental loss, hardware failures, and malicious attacks. cPanel comes with several backup options, including automated backups with Jetbackup, and also allows manual full backups that can be downloaded locally. Let us explore how to use these tools effectively.
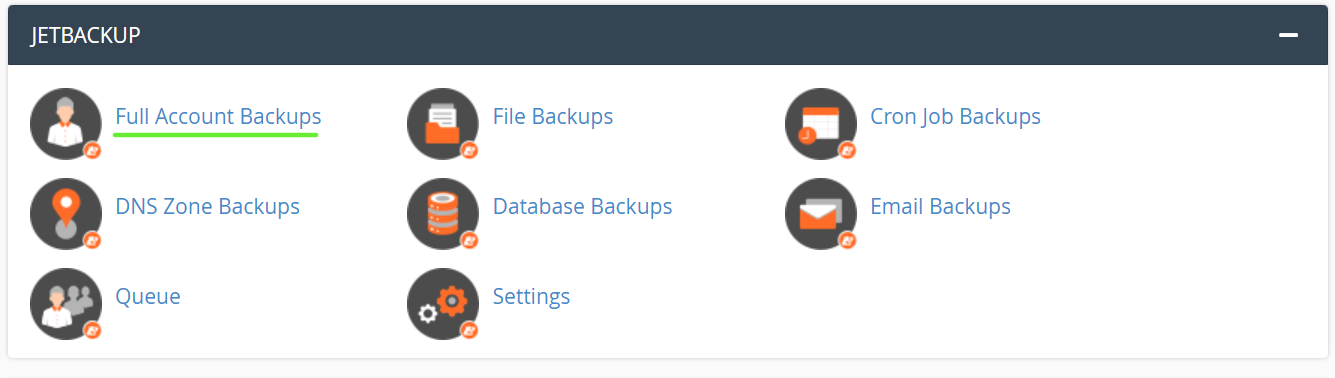
Automatic Backups with cPanel Hosting and JetBack
JetBackup is one of the powerful, automated backup tools offered by cPanel Hosting. Most hosting providers provide daily backup features that enable you to restore your website, databases, emails, or entire account with just a few clicks.
Steps to Restore File Backups Using JetBackup:
- Log in to your cPanel account.
- Scroll to the JetBackup section and select File Backup.

- Click File Manager under Actions.

- Select the folder you want to restore (usually public_html for your primary domain).

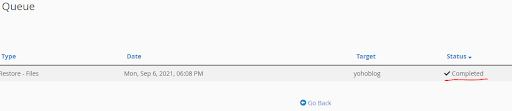
- Click Restore Selected and then Add to Restore Queue.
- Go to JetBackup > Queue to check the status. Once marked Completed, the restore is successful.


Similarly, you can restore full account backups, database backups, and email backups via JetBackup options by following similar steps.
Manual Backups for cPanel Hosting
cPanel also allows users to create a full backup manually and download it to their local machine for disaster recovery.
Steps to Create and Download a Full Backup:
- Log in to your cPanel account.
- Navigate to Files and click on Backup Wizard.
- Choose Download a Full Website Backup.

- Select the backup file you want to download from the list of available options.
- Select your destination and enter your email address to receive a notification when the backup is complete.
- Download the backup file to your local computer once the process completes.
Having a local backup is always a good practice that ensures you have immediate access to your data in the event of server issues or unexpected data loss. Similarly, following the above steps, you can have Database Backups, Email Backups and more.
cPanel Hosting for Beginners: Easy Disaster Recovery
Providers like Yoho Cloud offer daily backup options, allowing you to download backups to your local machine on a regular basis. This ensures that you can quickly restore your website even if your hosting provider’s backup fails or becomes unavailable. Moreover, it is recommended to schedule a backup before and after a significant website change for added security.
Setting Up Professional Email Accounts with cPanel Hosting
A professional email address is crucial for establishing trust and a strong online presence. Creating a business email address that matches your domain name is essential for establishing strong brand credibility. cPanel Hosting offers an easy way to set up and manage domain-based email accounts. Let’s explore how to create email accounts, access webmail, configure email clients, and manage essential features such as spam filters and autoresponders.
How to Create a Domain-Based Email Address
To create an email account in cPanel:
- Log in to your cPanel Hosting dashboard.
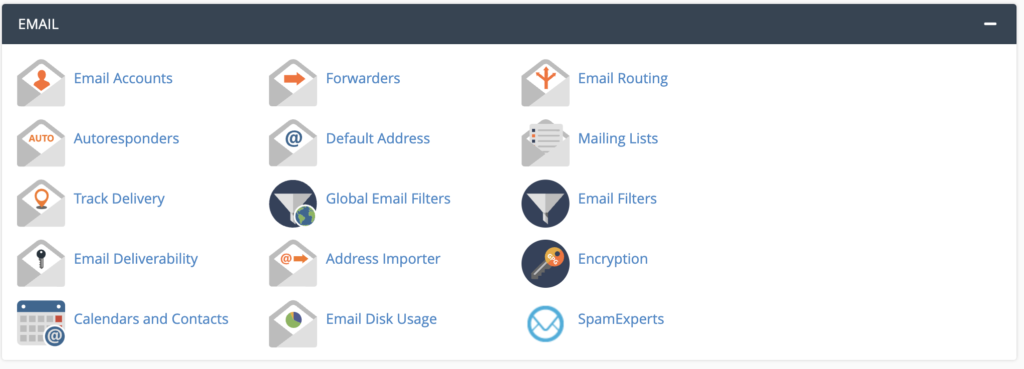
- Navigate to the Email section and click Email Accounts.
- Click “Create,” then select the domain for your new email (e.g., [email protected]).
- Set a strong password and allocate mailbox storage space as needed.
- Click Create to finish. Your new professional email address is ready to use.
Through this 5-step process, you can create multiple email accounts tied to your domain name, perfect for various departments or team members.
Accessing Webmail and Configuring Email Clients
Once your email account is set up, accessing your mail is simple through cPanel’s built-in webmail or by configuring your preferred email client (such as Outlook, Apple Mail, or Gmail).
- Access Webmail: In cPanel, navigate to Email Accounts, locate your account, and click “Check Email” to access your email. You’ll be taken to webmail interfaces such as Horde, Roundcube, or SquirrelMail.
- Configure Email Clients: Click Connect Devices next to your email account to find detailed setup instructions and mail server settings (IMAP, POP3, SMTP). Use these settings to add your email account to any desktop or mobile mail app.
Managing Spam Filters, Forwarders, and Autoresponders
cPanel Hosting provides various tools to keep your inbox organized and spam-free:
- Spam Filters: You can access spam filters in the email section. You can configure sensitivity, manage blacklists, and enable spam protection.
- Email Forwarders: These tools automatically redirect incoming emails from one address to another. This becomes extra useful when managing multiple accounts or directing emails to a shared inbox.
- Autoresponders: Setting up Autoresponders helps automate replies, making them perfect for out-of-office messages or acknowledging basic customer inquiries.
Managing Databases with cPanel Hosting (MySQL & phpMyAdmin)
The creation and management of databases are vital parts of running dynamic websites and applications, particularly when utilizing platforms such as WordPress, Joomla, or custom-built applications. cPanel Hosting comes with robust tools that allow users to create, configure, and manage MySQL databases efficiently. Let us understand how to create, manage, and connect databases.
Creating Databases for cPanel WordPress Hosting
cPanel comes with MySQL Database Wizard, an easy-to-use tool that simplifies database creation. You can create a database with this step-by-step guide:
- Log in to cPanel and navigate to the Databases section.
- Click on MySQL Database Wizard.
- Enter the name for your new database and click Next Step.
- Create a database user by entering a username and a strong password.
- Assign privileges to the user (e.g., All Privileges) to allow full control over the database.
- Complete the process; your database and user are ready for use.
This wizard helps beginners set up everything quickly, ensuring the correct permissions are assigned.
Managing Tables via phpMyAdmin
Once you’ve created your database, you can add multiple tables to it. Managing tables, running queries, and importing/exporting data is easily done through phpMyAdmin.
- Access phpMyAdmin from the cPanel Databases section.
- Select your database from the sidebar to view its tables.
- You can create, modify, or delete tables, run SQL queries, and manage indexes and relationships.
- phpMyAdmin also supports importing/exporting databases in various formats, handy for backups or migrations.
phpMyAdmin is a powerful tool that facilitates advanced database management tasks without requiring prior knowledge of command lines.
How to Connect to MySQL from an External Host
cPanel Hosting comes with excellent features, one of which allows you to connect to MySQL from an external host, enabling remote access to the MySQL database.
- Log in to cPanel and go to Databases > Remote MySQL.
- Add the IP address of the external host to allow access.
- Create a MySQL user with remote privileges in MySQL Databases.
- Use your server’s hostname, port (3306), username, and password in your MySQL client. For security, enable SSL/TLS in your MySQL client or consult your hosting provider for advanced options, such as SSH tunnels.
Domain Management with cPanel Hosting
Managing your domains efficiently is another significant aspect of maintaining a professional online presence. With cPanel Hosting, you can efficiently add and manage domains and subdomains, set up domain redirects, and even host multiple websites on a single account. Let’s explore how you can utilize these features to maximize the benefits of your hosting.
Adding Domains and Subdomains
What is a Subdomain?
A subdomain is a subsection of your primary domain, often associated with different areas of your website. For example, you can go to a blog at blog.yourdomain.com or a shop at shop.yourdomain.com. Subdomains correspond to folders within your hosting space, allowing you to organize your website content effectively.
How to Create a Subdomain in cPanel Hosting
- Log in to your cPanel dashboard.
- Navigate to the Domains section and click Subdomains.
- Enter the desired subdomain name (e.g., blog).
- Select the domain under which the subdomain should be created.
- Choose the directory where the subdomain files will be stored (typically a folder inside your home directory).
- Click Create to finalize the subdomain setup.
Utilizing this feature, you can create, manage, or delete subdomains at any time you wish.
cPanel Hosting: Setting Up Domain Redirection
Redirects are used to send visitors from one domain to another. You can either use 301 redirects (permanent) for SEO-friendly permanent moves, or 302 redirects (Temporary) for short-term changes. Here’s how to set redirects using cPanel:
- Log in to cPanel and go to Domains > Redirects.
- Choose the redirect type (301 or 302) and select the domain.
- Enter the destination URL.
- Enable Wildcard Redirect if redirecting all subfolders.
- Click Add to apply.
Hosting Multiple Websites on a Single cPanel Account
Based on your hosting package and cPanel support, you can host multiple domains on a single account using the Addon Domains feature. This is one of the cheapest ways to manage multiple websites without needing to purchase separate hosting for each one. E.g., Yoho Cloud’s Turbo cloud plan allows users to add an unlimited number of domains to their cPanel.
Important Considerations
- All domains share the same cPanel login; be cautious when sharing access to it.
- Regular backups of files, databases, and email accounts are essential for maintaining security.
How to Add and Host Multiple Domains
- Log in to cPanel.
- In the Domains section, click Addon Domains.
- Enter the new domain name you want to add.
- A unique subdomain and document root folder will auto-populate; leave them as is or customize.
- (Optional) Create an FTP account linked to the addon domain for developers or collaborators.
- Click Add Domain to finish.
Following these procedures, your new domain will now be hosted alongside your primary domain, each with its own files and email accounts.
Using Software Tools in cPanel (Softaculous, Cloudflare & More)
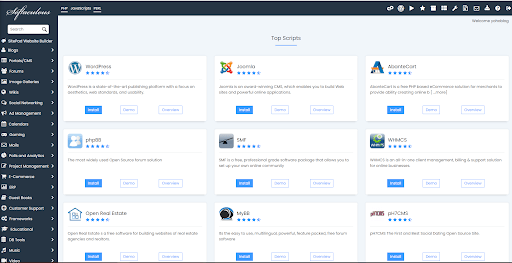
Overview
cPanel Hosting allows users to host various software, including Node.js, which is one of the most popular options for hosting Node.js applications.
cPanel Node.js Hosting: Getting Started
Hosting a Node.js application on cPanel is straightforward, thanks to built-in tools such as Setup Node.js App, Node.js Selector, and CloudLinux Application Manager. These tools are feature-rich, allowing you to deploy, configure, and manage your app with ease, eliminating the need for complex setup.
Step 1: Log in to cPanel
- Open your browser and go to your hosting provider’s cPanel URL.
- Enter your username and password.
Step 2: Navigate to the Software Section
- Scroll down the cPanel homepage to the Software section.
- Click Setup Node.js App to open the Node.js selector page.
Step 3: Install Node.js Selector (if not already installed)
- On the Node.js selector page, click Install Node.js Selector.
- Select the Node.js version you want, then click ‘Install‘.
Step 4: Create Your Node.js Application
- Click Create Application on the Node.js Selector page.
- Select Node.js version, environment (Production or Development), and other options like SSL if needed.
- Specify the app name and directory (e.g., ~/myapp).
- Click Create.
Step 5: Upload Your App Files
- Use cPanel File Manager or FTP to upload your app files to the created directory.
- Ensure your app has an entry point file (e.g., app.js or index.js).
Step 6: Configure Your App
- Set environment variables and any additional settings via the Node.js Selector interface.
- Confirm the root directory path is correct (relative to your home directory).
Step 7: Deploy and Run the App
- In the Application Manager, click Deploy next to your app.
- Once deployed, start the app by clicking Run (or manage it using tools like PM2 if you are using a terminal).
- Access your app at your domain/subdomain or IP address with the specified port.
Optional: Using CloudLinux Application Manager
You can also deploy applications via CloudLinux Application Manager for an easier interface that supports Node.js and Python applications. It enables one-click deployment while offering flexibility to select specific app types, versions, resource limits, and domain details.
Optional: Using cPanel Terminal
For tech-savvy users who prefer the command-line:
- Open Terminal from cPanel’s Advanced section.
- Navigate to your app directory (cd ~/myapp).
- Upload files via SCP or FTP.
- Run npm install to install dependencies.
- Start your app with’ node index.js’ or’ pm2 start index.js’ for background running.
- Access via your domain or IP + port.
Key Tips
- Verify your hosting plan supports Node.js.
- Use environment types wisely: Development for testing, Production for live apps.
- Register apps in Application Manager to manage multiple versions or test instances.
- Use PM2 or similar to keep apps running smoothly in the background.
Enabling SSL and Securing Your Website on cPanel Hosting
Security is always a top priority for any website owner, and cPanel offers the easiest ways to protect your site and its visitors by enabling SSL (Secure Socket Layer). SSL efficiently encrypts the connection between your web server and visitors’ browsers, ensuring high data privacy and security. Additionally, search engines prioritize websites with SSL certificates, which can help improve rankings, establish trust, and enhance online presence.
What is SSL and Why Does it Matter?
SSL (Secure Socket Layer) is a protocol that encrypts data transmitted between a client (browser) and a server. When a website has SSL enabled, you’ll see “https://” in its URL along with a padlock icon, indicating the connection is secure. This encryption prevents sensitive information, like passwords and payment details, from being intercepted by malicious actors.
Enabling SSL on your website:
- Protects user data by encrypting the connection
- Boosts your website’s SEO ranking, as Google favors HTTPS sites
- Builds trust with visitors, increasing the likelihood of engagement and sales
- Complies with modern browser standards, which warn users about insecure (HTTP) sites
Installing SSL certificates on your cPanel is made easy with cPanel’s features. Here’s how you can easily install SSL certificates on your cPanel hosting.
Installing Free SSL via AutoSSL on cPanel Hosting
With Yoho Cloud plans, you get free SSL certificates with hosting plans. To install it, you can access AutoSSL, a free and automated way to install SSL certificates for your domains. Here’s how you can enable it:
- Log in to your cPanel account.
- Scroll down to the Security section.
- Click on SSL/TLS Status or Manage AutoSSL (depending on your cPanel version).

- You’ll see a list of your domains and subdomains. Select the domains you want to secure with SSL.

- Click the Run AutoSSL button.

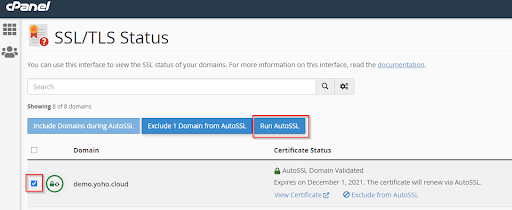
AutoSSL will then request and install free SSL certificates (usually from Sectigo) for the selected domains. This process can take anywhere from a few minutes to a day, depending on the rate limits and verification steps that are in place. Once complete, you’ll receive a success message.
If AutoSSL fails, typical reasons include DNS issues, such as your domain not resolving correctly or not pointing to the correct IP address of your cPanel server. Ensure that DNS settings are correctly configured to prevent errors.
If AutoSSL hasn’t installed SSL within 36 hours or you face issues, contact your hosting support for assistance.
Manually Installing SSL Certificates Using Let’s Encrypt on cPanel
Suppose your hosting provider does not offer AutoSSL, or you prefer more control over your SSL certificate. In that case, you can manually install SSL certificates using Let’s Encrypt, a free, automated, and open certificate authority.
Before you start, make sure:
- Your domain and its www subdomain point to your cPanel server’s IP address.
- The domain is either parked on your hosting account or correctly pointed via DNS.
Steps to manually install Let’s Encrypt SSL:
- Log in to your cPanel and navigate to the Security section.
- Click on “Let’s Encrypt SSL” (sometimes referred to as SSL/TLS Manager with Let’s Encrypt plugin).

- Select the domain you want to secure.
- Click Issue under the Actions column.

- Choose your domain options:
- Include Wildcards? Select this if you want to secure all subdomains (e.g., *.yourdomain.com). Note: Wildcard SSL requires DNS validation.
- Add cPanel subdomains? Optional, but recommended if you want SSL on your hosting subdomains.
- Select the validation method:
- HTTP-01 Validation: Verifies domain ownership via HTTP requests. Recommended if your domain is hosted on your cPanel server.
- DNS-01 Validation: Verifies ownership by adding DNS TXT records. Required for wildcard SSL.
- Click Issue to generate and install the certificate.


Your website will now be accessible securely over HTTPS.
Why SSL is Essential for SEO and Trust
- SEO Benefits: Google uses HTTPS as a ranking signal. Sites without SSL may rank lower and even show security warnings, discouraging visitors.
- User Trust: Visitors expect secure browsing, especially if they’re submitting sensitive information. Browsers like Chrome display “Not Secure” warnings on sites without SSL, which can damage credibility.
- Compliance: Many regulations and standards require encrypted connections for data protection (e.g., GDPR, PCI DSS).
Installing SSL on your cPanel hosting is mandatory if you want to safeguard your visitors and earn their trust. Your website’s reputation and SEO performance depend hugely on SSL.
Optimizing cPanel Hosting Performance & Usage Limits
There are various ways to optimize cPanel Hosting Performance and usage limits, as cPanel offers several tools. Shared hosting environments require special consideration of resource balancing to ensure smooth operation for all users. This is where CloudLinux LVE limits come into play, helping to maintain server stability and fairness.
Understanding CloudLinux LVE Limits in Shared Hosting
So what does CloudLinux do? It limits CPU, memory, and other resources in shared hosting environments to ensure stable performance. This helps avoid slowdowns, monitors usage in cPanel’s Metrics, optimizes scripts and plugins, and turns off unnecessary cron jobs. While CloudLinux helps a lot, it doesn’t magically extend your shared hosting capabilities. If you’re frequently reaching your limits, consider upgrading your plan.
Fixing High Physical Memory Usage in cPanel
One of the most common issues in shared hosting is high physical memory usage, which can slow down websites or cause temporary outages. You can follow the steps below to reduce memory usage on cPanel hosting:
- Identify resource-intensive scripts or plugins running on your website.
- Optimize your website’s code and database queries for improved performance.
- Disable unnecessary applications or cron jobs.
- Consider upgrading your hosting plan if you consistently hit memory limits.
By monitoring and managing memory usage, you can prevent excessive consumption and improve your site’s responsiveness.
How to Monitor Resource Usage in Your cPanel Dashboard
Monitoring resource usage is crucial for maintaining optimal performance. Most cPanel dashboards provide tools to track:
- CPU usage
- Memory usage
- Entry processes (simultaneous connections)
- Disk space and inodes usage
- Bandwidth consumption
To monitor resources:
- Log in to your cPanel account.
- Navigate to the Metrics section.
- Access tools like Resource Usage or CPU and Concurrent Connection Usage.
- Review your current usage stats to identify any limits you are approaching.
Regularly monitor these metrics to optimize your website and proactively avoid exceeding resource caps, which can lead to downtime.
In summary, understanding and configuring CloudLinux LVE limits, managing physical memory efficiently, and utilizing cPanel’s built-in monitoring tools are all crucial steps toward optimizing cPanel performance. By doing so, you ensure your website runs smoothly, providing a better experience for your visitors.
Frequently Asked Questions about cPanel Hosting
What is cPanel, and how does it work?
cPanel is one of the most popular web hosting control panels, enabling users to manage websites, domains, email accounts, and more through an intuitive graphical interface.
How does cPanel differ from other control panels, such as Plesk?
cPanel was primarily designed for Linux hosting environments and got popular for its simplicity and widespread community support. While Plesk offers similar functionalities, it works on both Linux and Windows servers. It features a distinct interface and feature set.
Is cPanel suitable for WordPress hosting?
Absolutely! cPanel makes managing WordPress hosting easier with its feature-rich functionalities, including one-click installers, automated backups, and easy access to database and file managers.
Do I need technical skills to use cPanel?
No, cPanel is entirely GUI-based and can be accessed by users of all skill levels. Beginners can perform essential tasks with ease, while advanced users can utilize more advanced server management options.
Can I install SSL certificates via cPanel?
Yes, cPanel supports the easy installation of SSL certificates, including free options like AutoSSL and Let’s Encrypt, which help you secure your website with HTTPS.
How do I monitor resource usage in cPanel?
You can check CPU, memory, and bandwidth usage directly within your cPanel dashboard, under sections such as Metrics or Resource Usage.
How do I reset my cPanel password?
To reset your cPanel password, you can visit your hosting provider’s client area or also use the password reset option in cPanel’s login page. Moreover, if you find it difficult, you can always contact Yoho Cloud’s support, where our experts will guide you through the entire process.
Can I migrate my website to cPanel hosting?
Yes, most hosting providers offer migration tools or services to help transfer your website smoothly to a cPanel environment. With Yoho Cloud, you can experience free migration services when migrating from another provider.
Is cPanel free to use?
cPanel is a licensed software, so hosting providers include its cost in their hosting plans. There’s no standalone free version for end users.
Final Thoughts: Is cPanel Hosting Right for You?
cPanel remains one of the most popular web hosting control panels due to its balance of user-friendliness and powerful features. It’s an excellent choice for users who want to easily manage their website, email, databases, and security without needing advanced technical skills.
Whether you’re a blogger, small business owner, or developer, cPanel can simplify daily hosting tasks and improve your workflow. Its wide support for popular applications such as WordPress, straightforward SSL integration, and advanced resource monitoring tools make it a versatile control panel for all hosting needs.
While cPanel remains the best control panel for managing a hosting environment, other control panels might perform better based on your specific needs. But for most Linux-based shared hosting scenarios, cPanel is a reliable, beginner-friendly, and the best option. If you want to know about other alternative to cPanel, check out 10 cPanel Alternatives for website management.
The performance of cPanel largely depends on your hosting provider. For businesses and startups, cPanel cloud hosting in Nepal can be a reliable and cost-effective choice.

WordPress Security: A Beginner’s Guide to Staying Safe
Editorial StaffHow to Improve Email Deliverability & Avoid the Spam Folder
Editorial Staff